
Hi Internet Friends!
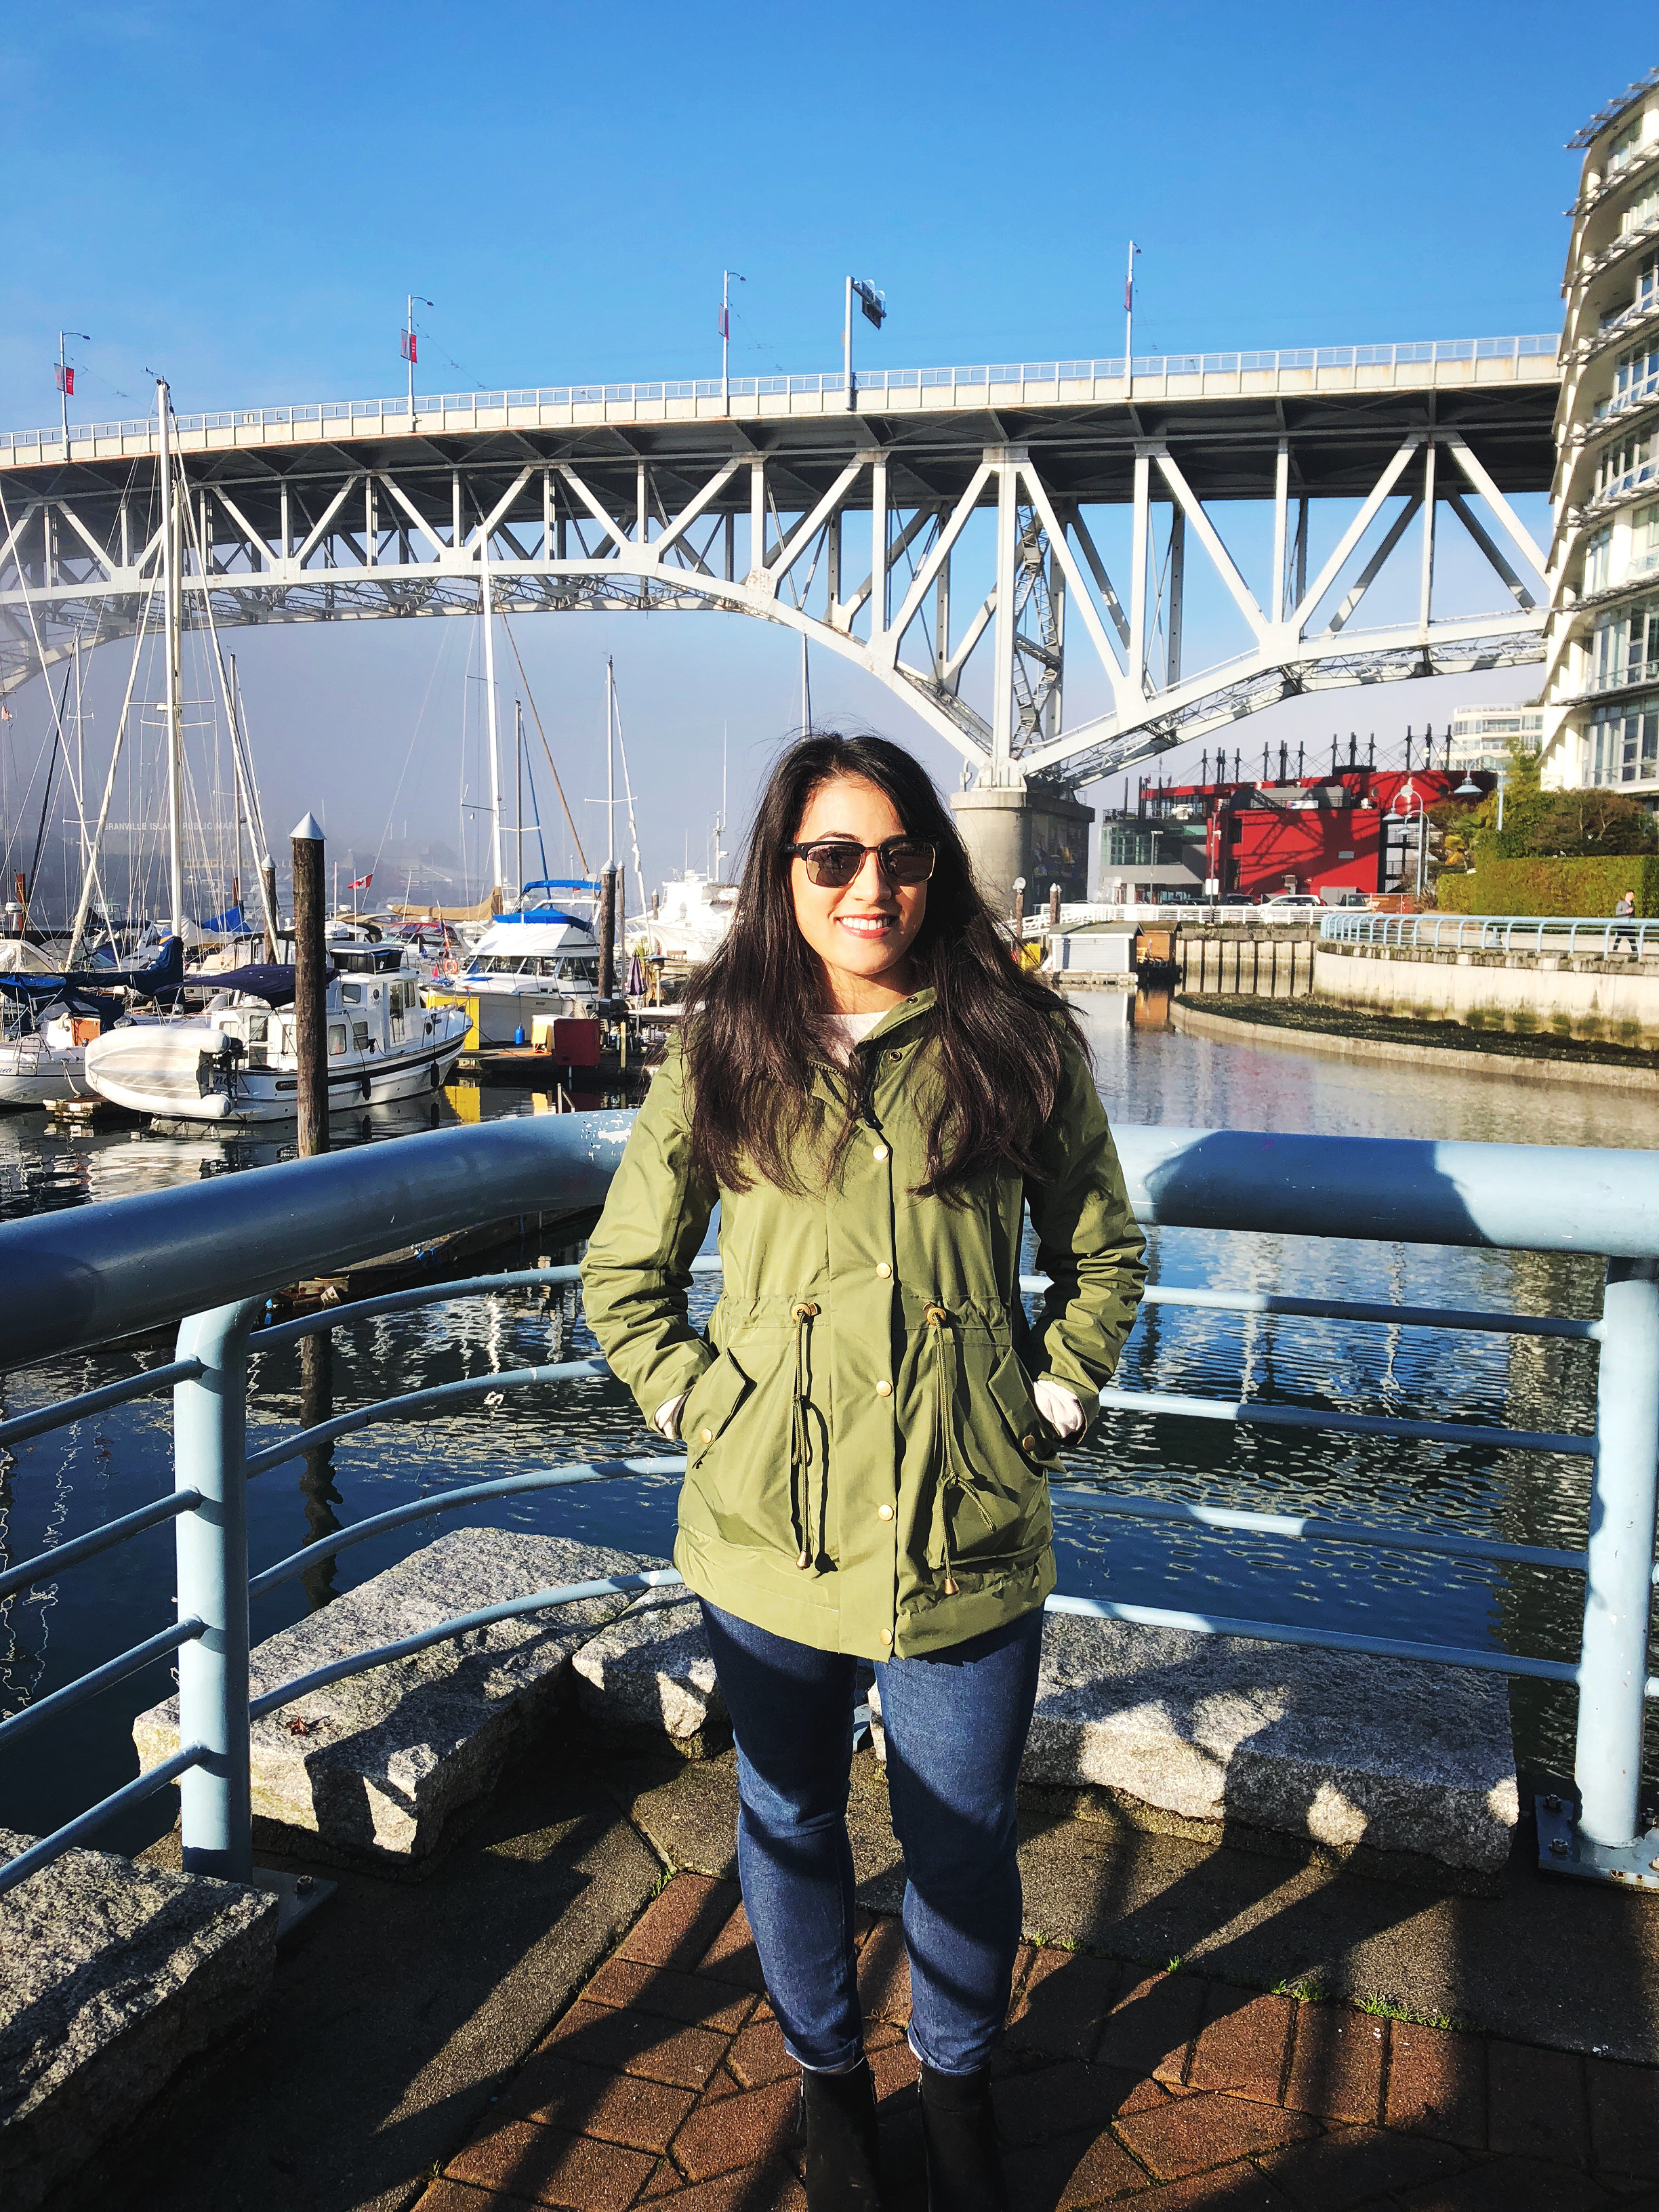
As promised I'm sharing with you the last project that I finished in 2017. My WATERPROOF Kelly Anorak! Why is waterproof in capitals? Because it's WATERPROOF as in no water can get in, as in a fully functional rain jacket, as in the Vancouverite holly-grail. For those of you who don't live in a rain soaked region you may not fully appreciate the awesome-ness of a fully waterproof jacket (and I don't blame you, I didn't realize how clutch having a stylish waterproof jacket was until I moved here). But believe me, when it rains 70% of the time having a jacket that you can trust to keep you dry is a god-send for the days where you either a) didn't remember your umbrella/were overly optimistic about the rain forecast or b) when the rain is coming sideways and so the umbrella is useless anyway. Now I've had my share of 'water resistant' jackets that while were cute, didn't cut it in the keeping dry department, which was fine for a while but I got tired of being semi-damp half the time. I did have two waterproof jackets, one is a sporty jacket that I wear for camping and hiking and things but it's fluorescent pink....great for emergencies in the wilderness but not so stylish on a day to day. The second was a nice jacket that my mom had bought for me years ago, back in a time where I was more apt to buy based on what I thought the label size should say and not necessarily what fit properly, it was too tight in the shoulders and chest for me to really fit a sweater underneath it which made it uncomfortable to wear in colder weather (it does get cold in Vancouver too ya know, just not normal Canada cold!). I think we've all made this label based decision this at some point or another until we realize that no one else can see the bloody label anyway and if you just cut it out when you get home then you won't either. Anyways, when the Kelly anorak released from Closet Case Files over a year ago I knew that this was my opportunity to make myself a perfectly fitting, waterproof, stylish jacket :D
ps. ironically for a post about a waterproof jacket the pictures below are from a super sunny day because of course the day I choose to take pictures was the only day last week where it didn't rain......although we did have some weird fog that day which you can see in the pictures below, we basically managed to time everything right such that we got the only 20 min window where the fog had cleared a bit to take pictures in...the fog rolled back in almost as soon as we were done
So when one chooses to make a waterproof jacket where does one begin? Well first you pour yourself a large glass of wine and then you sit yourself down to read a bunch about waterproof fabrics. If you don't want to do this I'll give you the condensed version, basically in terms of waterproofing there are three categories, not waterproof, water-resistant, and waterproof. In the first category we have most fabrics, water is easily absorbed and retained by the fabric, so no good for a rain jacket. With the other two categories comes the major distinction, resistant vs proof. Water resistant means that the fabric will prevent some water from being absorbed but with either enough time or volume of water it will be absorbed through. Proof means that water will not be absorbed but will be repelled, this can be easily seen on most waterproof fabrics by droplets of water staying as round drops on the surface of the fabric that over time are not absorbed. With this waterproof comes a huge disadvantage however, these fabrics are not breathable meaning that any of your natural moisture, or any sweat that you accumulate while walking around, will remain within the garment which is not a great feeling. To combat this nature of waterpoof fabrics Gortex was invented! Essentially gortex is a thin membrane that has been fused to the underside of the waterproof fabric that allows a one way ventilation of moisture from inside the garment to the outside, ensuring that you stay comfortable and dry :) (If you would like to read more about waterproof fabrics I recommend this post from Sewaholic that you can find here, (there is of course much more to waterproof breathable fabrics than I covered here but this gives you the general idea)

I'm also wearing my new geodesic sweater and a pair of mid rise ginger jeans :D
Since I had had my fill of 'water-resistant' jackets I went with a breathable waterproof in the form of a 2-Ply Ultrex fabric from Seattle Fabrics. Now I hear you asking what's Ultrex and why does ply come into this? From speaking with different vendors what I've pieced together is that apparently the patent on the breathable membrane that makes Gortex awesome expired some time ago meaning that other vendors have been able to create waterproof breathable fabrics with similar characteristics to Gortex (although I'm sure the folks at Gortex would argue that they have better quality of course.) Ultrex is one such brand, Dintex is another that I came across with similar properties, do you sense a theme here with the names? The ply factor seems to imply if the fabric has an additional layer of fabric on the membrane side, the side that will come into contact with your body. With a 2 ply fabric, the fabric is comprised of just the outer waterproof fabric and the inner breathable membrane, making the fabric more lightweight. This lightweight construction does come at the cost of durability as the membrane is not protected so a lining is advised. 3ply fabric comes with a fused third layer that can range from a mesh like tricot to a fleeced backing that helps protect the membrane while maintaining breathability, this does mean the fabric is more dense but it does signficantly increse the life of the garment.

Hardware closeup! I sourced all of the additional hardware (cord toggles, snaps ect.) from Dressew
Why did I go with a 2ply if the 3ply has better durability and negates the necessity of a lining? Colour...I really wanted a olive green jacket and the only green in the 3ply I could find was forest green (though it is still a lovely forest green!) I looked every where for a 3ply in olive green in my price range (the lovely people at Thread Theory even promised to email me if they got the colourway in!) but I couldn't find it in my price range (waterproof ain't cheep yo!) so I went with the 2ply knowing that I would have to draft a lining. But Heather released a lining expansion for the Kelly anorak I hear you say! So I actually bought this fabric over a year ago when I decided to make the jacket and then sat on it for said time frame because I was too afraid to cut into it ($$$) and I was still mulling over how to draft a lining and what to make the lining of, it had to be breathable or else there was no point. So there I was sitting on a massive pile of not cheep waterproof breathable fabric twiddling my thumbs (Did I mention that I had actually committed to making 3 waterproof jackets? more on that in a second) being a big chicken. Fortuitously this ended up working in my favor as during that time Heather released a lining expansion for the jacket, meaning that I wouldn't have to draft my own AND Caroline from BlackBird fabrics started carrying a fab breathable bemberg lining in the luscious burgundy that you see below. I still had to 'gird my loins' and cut expensive fabric though.....

Loving the burgendy lining!
So I did what I always do when I'm too afraid to commit to a project, I make the situation unbearable until I muster up the courage to dive in. Similar to the way I forced myself to learn to sew jeans by not allowing myself to buy new ones when my old ones died, I gave away my other rain jackets to charity in the fall. I got lucky for a while since it actually snowed here for a bit so I wore my wool Minoru jacket while I embarked on this crazy project. Another contributing factor to my procrastination was having to seal the seams to ensure waterproofness. I bought some seam sealing tape when I bought my fabrics but I was still hesitant...what if I accidentally burned the fabric?? A few practice seams later I was confident that I could pull this off....though those practice seams did come back to bite me in the butt...
After making a muslin and making my usual 'short person adjustments' (taking up the waist by about an inch and the sleeves by a similar amount), I dug in one cold and rainy weekend in November. After all my trepidation I was doing it, I was making a waterproof jacket, and the process was surprisingly quick! I had to make a few adjustments to my machine which was honestly the only thing that sucked as it did take some time. I used a mircotex needle to ensure that I had very small needle holes to minimize any potential leakage just in case the seam sealing tape wasn't properly secured. My machine did not like sewing when I had the right sides together of the fabric, aka when the membrane was facing out, the fabric kept shifting around. I ended up putting tape on my presser foot to increase the glide and reducing the pressure on the foot to help with shifting of the fabric. I also had to get into the habit of starting a seam a good 1/4 to 1/2" from the end of a seam so that I could place a pin to again help prevent shifting and misalingned seams. Even with all of these adjustments I still had some issues with minor puckering especially around curved edges. I fixed as many as I could within reason but resigned myself to having a few minor puckers here and there as I didn't want to put too many holes in my fabric.

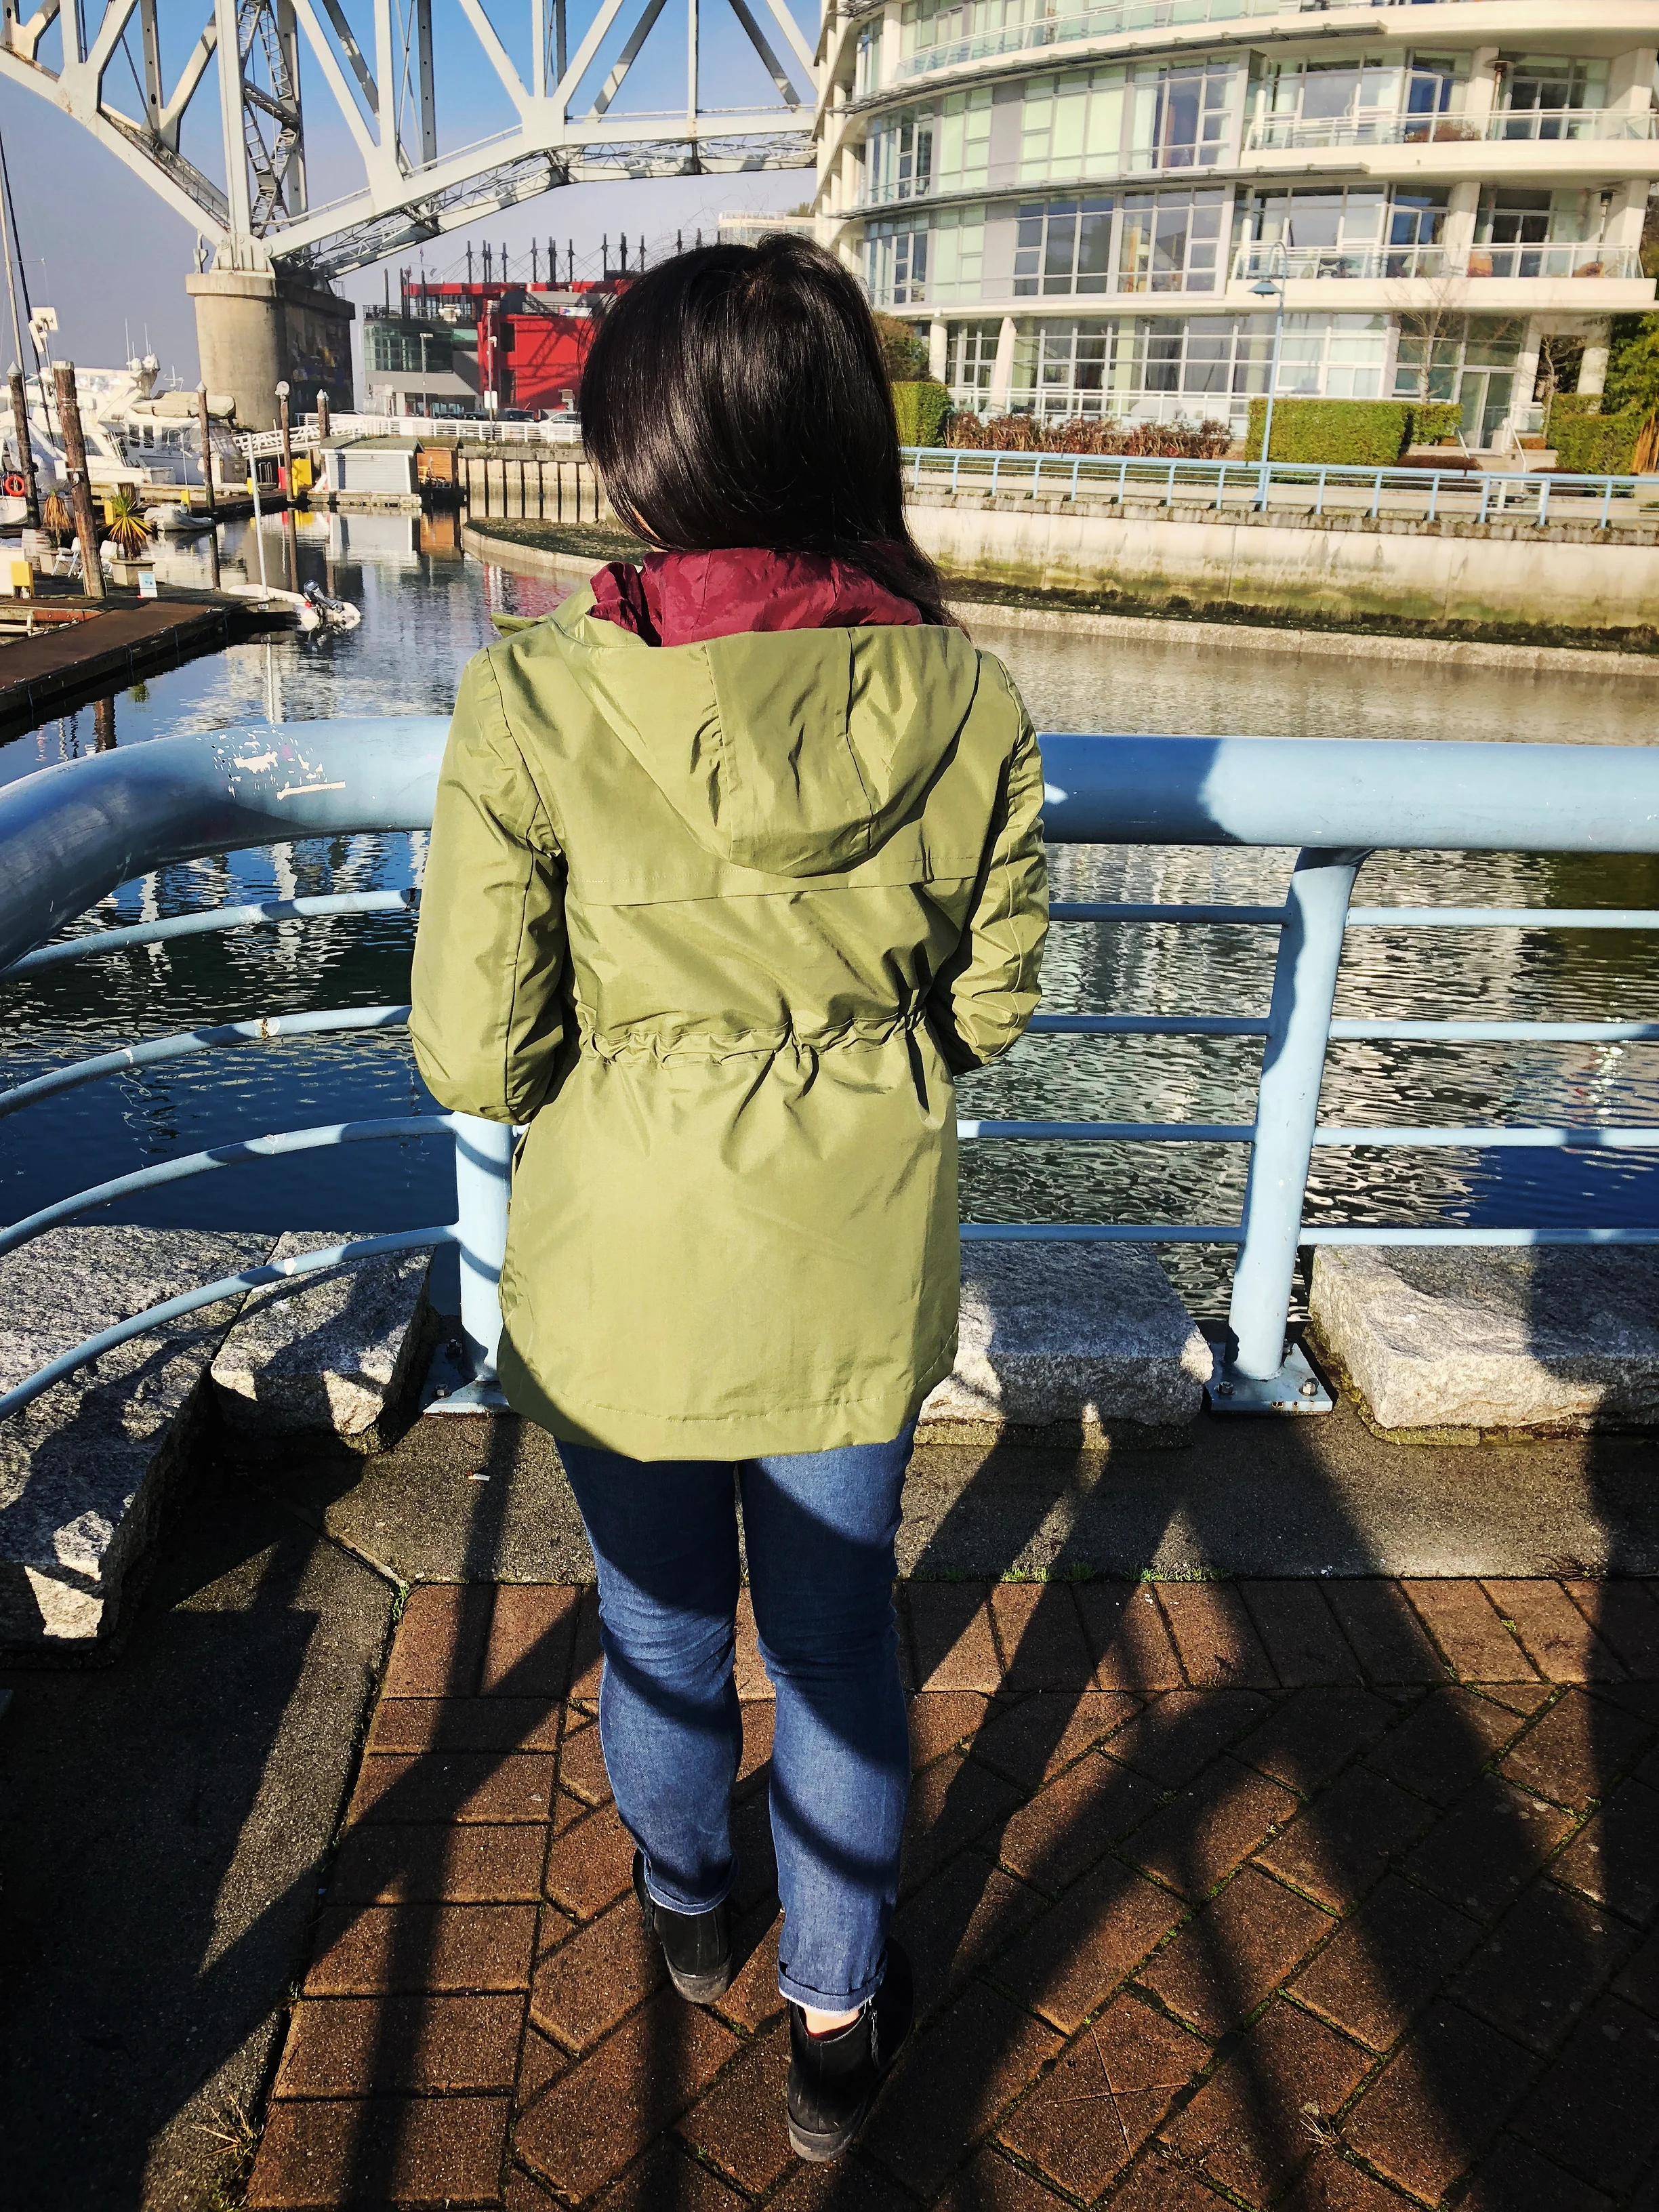
This is what the hood would look like if it was raining! I love a 3 piece hood, it does take an extra step or two but so worth it for the finished look and function (it's easier to wear with a pony tail in my opinion)
The seam sealing tape also added a few puckers as well, especially around the armholes. I clipped as much as a I felt comfortable without compromising the whole purpose of the tape which is to seal in the seam but it was still hard going to get a flat, well seamed seam with out puckering with my home iron. Again I resigned myself to this and went for wearability vs. perfection and in the end no one has noticed my slight imperfections :D Speaking of seam sealing, as I eluded to above those practice seams really bit me in the butt, I had ordered 30m of tape thinking I would have more than enough for all the jackets I was going to make and ran out when I was finishing my hood, I just needed about a meter more! The total distance of seams is much greater than you think especially when you take into consideration the pockets are a version of patch pockets so those seams need to be sealed as well! I ended up staring my jacket, changing up the order of sewing a bit so that I sewed the entirety of the jacket first, only stopping when I ran out of tape before sewing the lining and waiting two weeks for more tape to come in :S I also ended up changing the order of some of the steps when I was inserting the lining because I found the instructions as written resulted in you turning the jacket right side out and then inverting it again too many times. Heather eluded to some of the instruction issues with the lining expansion in her end of year post so I think as long as you are checking as you go that everything will 'make sense' by the end, aka the lining will be on the inside and the jacket on the outside, you'll be fine with what ever way you insert the lining. I hand sewed the hood facing to the lining as well instead of stitching in the again to reduce the number of holes in the fabric and to prevent having to add a visible portion of seam tape. I also omitted top stitching through the waistband and lining, again to prevent having to add seam tape on top of the lining (I had seam sealed the waistband prior to inserting the lining).

The sunlight did some weird things to how the Ultex looks in this image but it's kinda cool!
In terms of improvements for next time I think I would make the sleeves just a scant 1/2" longer even though technically they end where they should. I'm just so used to having sleeves that don't fit and that are too long that it makes me think that my wrists are cold since they are slightly exposed! I would also line the pocket to ensure that the membrane inside is protected, I don't know why I didn't think to do that before and I don't think it will be a huge issue but I'm just very wary of keys or rings scratching the membrane off (I also think I've devised a way to make the buttoned flap a functional pocket, I'm going to test out a few things and let you guys know!) Other than that fit wise it's perfect! The drawstring waistband means that I can fit even my chunky sweaters underneath with no problems and there's enough room to move about in comfortably :D Semi more importantly I've tested it and IT'S WATERPROOF! Before Christmas we had a this heavy slushy rain/snow on the day we were having a pre-christmas lunch at work. I gave my umbrella to a co-worker who forgot theirs and walked the 15 min to the restaurant and the 15 min back WITH NO LEAKS! There was a slightly damp spot near the drawstring by the zipper but I think that's from how I took the jacket off and inadvertently got some moisture inside. I'm so pumped to have made this jacket guys! and for it to actually be both stylish and functional! I can't wait to sew the other ones!

Others you say? As I mentioned above I actually committed to sewing 3 waterproof jackets :O It started off with two, one for me and one for the fluffy blonde monster since his rain jacket had actual holes in it. After doing a ton of research on fabric sourcing I was super frustrated that a) I realized I would have to buy 2ply for my jacket to get the colour I wanted and b) I would end up paying out the nose for shipping to Canada. Around this time I realized that I would be going to California for work so I kindly asked my cousin if I could ship the fabric to her and then pick it up while I was there. Some flattering words later about my projects and how she would 'love to have an original Becca Made That' I was then sewing 3 waterproof jackets! Lucky for me the other two jackets are in 3ply which I've already tested and my machine likes much better (it has more to grip on with the fused lining), and I won't have to line these versions as long as I make the seam sealing 'pretty' on the inside. I'm going to have a follow up post in a few days on sewing and seaming 2 vs 3ply as well as a small investment I made into a mini iron that makes seam sealing super duper easy! I wish I had bitten the bullet and bought it before I sewed my jacket but #ShouldaWouldaCoulda

That's all for this post! Well except for the photo below showing the 'waterproof-ness' of the jacket (of course it was bright and sunny the day I took rain jacket photos). Let me know if you have any questions about sewing with waterproof breathable fabrics below and I'll try to answer them in the next post!
